
DIY’s Don’t Have to be Scary!
There are just a few more days till the big night of Halloween! Which we all know what that means… Lots of Jack-o-lanterns, costumes, candy, cool temperatures, bonfires, and plenty more traditions! I’m not sure what your feelings are about Halloween, but I remember Halloween being much more fun before I had children. Don’t get me wrong; I love seeing my kids dressed up and eager to go trick or treating. But moms...for real…let’s be honest with ourselves and put it out there straight. There is always one child that is crying about their costume….too tight...too itchy...blah..blah..blah, crying because they are coming down from a sugar rush from school that day, hungry because they didn’t like the quick meal you made (even though you thought Oh! This will be fun!...they ALL will like this!) Seriously, Halloween is a hot mess express for us each year! And if this isn’t how your Halloween goes down year after year…. God Bless you; because Halloween is definitely not my favorite holiday.
Regardless of how your Halloween is; full of happy and chill kids or full of pure exhaustion from taking our kids on a candy frenzy we can all agree we still have time to enjoy the fall colors and pumpkins through the month of November!
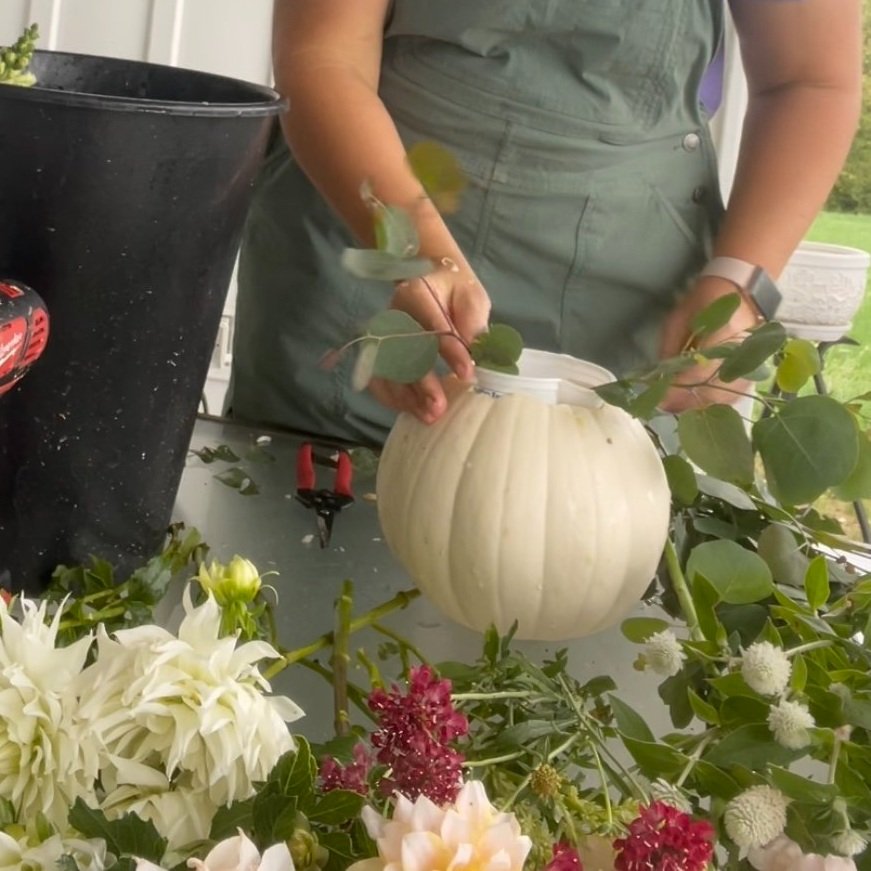
Now is the time to clean out that cute pumpkin you have been adoring for the last few weeks on your porch and make a pumpkin arrangement with me! Follow these 5 simple steps with me!
Step 1.
Once your pumpkin is cleaned out, use a deep sour cream container or a red solo cup. This will hold your water and flowers and keep your pumpkin dry. Add water to the cup this will weigh down your cup and it will help you arrange your flowers.
Step 2.
Start with the foliage. I am using Eucalyptus, but any foliage or even evergreens from your landscape will work for this. Place 4-5 stems in opposite directions to create a grid. This will help support your flowers. NOTE: strip all foliage that will enter into the cup; usually the bottom half of the stem. Foliage sitting in water will create bacteria; therefore it will decrease the flower’s life.
Step 1. Add your container
Step 2. Add your foliage

Step 3. Add some filler flowers
Step 3.
Add a few stems of your filler flowers. This will increase your grid pattern and add support for your larger flowers. I am using gomphrena. Side Note: This little white flower is a great filler and dries beautifully!
Step 4.
Start adding your focal flowers. Decide if you want your arrangement to be one-sided or have a continuous 360° view. Add flowers at different angles and heights. Your arrangement should be about the same height as your pumpkin. The focal flowers I am using are two types of dahlias! Definitely show stoppers!
Step 5.
Add more filler flowers to create texture, color balance, and height. You may even need to add more foliage to fill in. I added green feather celosia and maroon scabiosa. REMEMBER! There is no wrong way to create a floral arrangement. Just relax and trust the process!

Step 4. Start adding your focal flowers! The star of the show!

Step 5. Add filler flowers to add texture and extra color.
You may be asking after reading these five simple steps is how do I get flowers??? Well; you have a few options! 1. Of course if our farm still has flowers; check out our website and order a bouquet. 2. Go to your favorite florist! They sometimes have take-and-go bouquets you can use for this craft! 3. If you are in a pinch for time (we all have been there!) check out your local grocery store floral department for a few small bouquets. Open the packaging and recut the stems and place them in a bucket of water for extra water intake and to extend your flower’s life until you are ready to design your pumpkin arrangement!
I hope you get a chance to try your hand at creating a pumpkin arrangement! It really is not scary. I know you can create one! Make it a BFF friend craft night with your favorite spirits! And then take them home to display on your kitchen island, strawbale near your front door, or even your patio table near the bonfire! Enjoy Friend!
See you soon BFFs!
Carrie
Want to host your own DIY Event with your closest BFF’s?
Check out our DIY Buckets!